Drawing Foreshortening Models Allan Books Gootfied
Here are a few basic concepts of artistic perspective you absolutely need to know, whether your intentions are expressive or realist-minded.
by Dan Gheno
No, you're not the only artist who is afraid of perspective and foreshortening. For beginners and advanced artists alike, the fear is as palpable and primal as the fear of snakes. Fortunately, we can try to avoid the places where snakes reside. Unfortunately, as image-makers we cannot avoid the artistic snake pits of perspective and foreshortening. If you want to give your figure drawings a believable sense of volume and depth surrounded by atmosphere, you need to develop an awareness and working knowledge of foreshortening and perspective.
Luckily, figurative artists do not need to learn as much "mathematical" perspective as architects and engineers must in order to do their jobs well. Indeed, as you will learn in this article, most figure drawing requires only a little working knowledge of "artistic" perspective. If you know how to draw a box in perspective, you probably also know how to draw a human figure, an animal, or almost any other form in plausible perspective.
Mathematical Perspective
 |
| Figure 1: Perspective Drawing of Standing Figure by Dan Gheno, 2006, colored pencil and white charcoal on toned paper, vector lines superimposed digitally, 24 x 18. The human figure is much more complicated than a box. However, like a box, the human body has front, side, and back planes. Also, there are many parallel or bisymmetrical landmarks on the human body, such as the nipples, points of the hips, feet, knees, eyes, and shoulders. Therefore, we can utilize the same kind of converging construction lines that we use when drawing a box to test out and develop the perspectival relationships within the figure. All of these converging lines meet at a spot called the vanishing point (C) found on the opposite page. |
The first thing you need to do when using perspective to help you draw the figure is determine the horizon line or eye level. Finding the eye level is as simple as holding up your pencil in front of your eyes. Now, imagine that you are drawing a box of the same height and width as your human subject (Figure 1). Let's say the top of the box (A) is above your eye level, and the bottom baseline (B) is below your eye level. We would notice that the top edge would angle away and downward toward the horizon line (H), and the baseline would angle away and upward toward the horizon line, and if you drew imaginary lines from the top and the bottom to a point on your horizon line, they would converge at a spot called the vanishing point (C). Although the human figure is a heck of a lot more complicated than a box, there are enough parallel or bisymmetrical landmarks on the human body, such as the nipples, points of the hips, feet, knees, eyes, and shoulders, that we can use similar converging lines to give drawn figures a believable sense of perspective depth.
It's vitally important to find the perspective baseline of each figure you draw, whether you are drawing a reclining, seated, or standing figure. What's a perspective baseline? It's nothing more than the bottom perspective line, where the figure touches the ground plane as in Figure 1 (B). When students in my class have difficulty with this concept, I try to make it more tangible for them by laying a long pole on the model stand, lining it up with the back of the model's feet. Sometimes, I also put separate poles behind the legs of any furniture that they are having trouble drawing in correct perspective. From the student's easel, these poles look like actual perspective lines running across the model stand, and once fixed in their eyes as a firm, optical image, they usually find it much easier to replicate these so-called imaginary lines as real lines on their paper. Many artists erroneously draw this baseline flat, parallel to the picture plane, even if the rest of the figure obviously tilts away in a three-quarters view. It's especially a problem for artists when they draw reclining poses. Usually the baseline angles away from your picture plane at least a little bit, as diagramed in the drawing by Francisco Bayeu. Just like all the other perspective vectors in your drawing, the baseline will tend to aim toward your horizon line.
Perspective becomes a little more complex when you combine multiple figures or objects such as furniture in one drawing—but not much more complex. As one can see by visiting the archeological museum in Naples, the Roman fresco painters had a working knowledge of converging planes, even if they didn't understand the mathematical reasoning behind it. Likewise, early Renaissance artists devised a rudimentary form of artistic perspective called costruzione legittima that works. Simply put, these artists linked all of their figures to the horizon line starting with one key figure. If the horizon line passed behind the key figure's eyes, then no matter how far back in the distance other people may stand, and no matter how small they may look visually, their heads will all roughly line up along the horizon line—with exceptions made for children or individuals of shorter stature. The heads of these figures will be planted a little lower than the horizon—or a little above for a taller person.
Intuition vs. Mathematical Perspective
 |
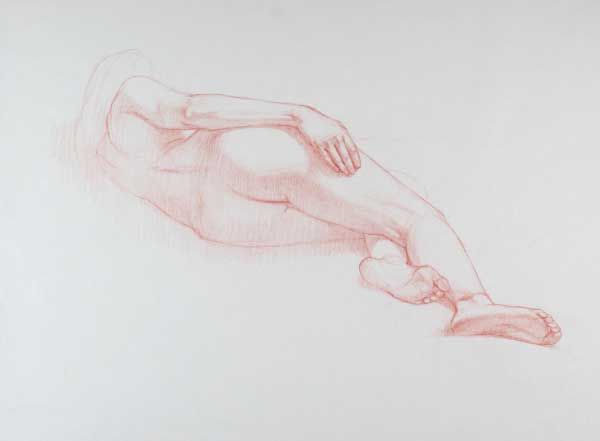
| Reclining Woman by Dan Gheno, 2006, colored pencil and white charcoal on toned paper, 18 x 24. As one form on the model intersects and crosses over another, let the line that's describing the front form overlap the stroke describing the back form. For instance, in this drawing note how I let the foreground ankle overlap the lower leg. You can also selectively darken and/or thicken a line as it overlaps the back form, as happens here at the knee. Don't turn this tool into a predictable rule, however. Notice how it is used in some places and not others. In this case, the bright-white tonality of the hip was sufficient to advance its form in front of the stomach area. It would've been overkill to add a line along the edge of the hip. It's essential to let a little air into the edges of your figure occasionally, rather than wrapping all the forms in an all-encompassing, stiff, and solid line. |
According to artist J. Leonard Watson, "If the head and face were geometrical in form, like a cube or cylinder, their foreshortening could be accomplished with mathematical precision by means of mathematical perspective, but the surfaces of the head and face are complex, and in consequence cannot be governed by any simple rule of perspective. The eye must be the sole judge." You can learn all of the complicated, graduate-level mathematical perspective you want, but it mostly comes down to this: The stuff that's closest to your eye looks bigger than the stuff farther away. The Romans knew this, and so do you if you trust your own eyes.
Foreshortening of the limbs and torso doesn't always come easy at the outset. To understand the concept, you must first understand the word foreshortening itself. "Foreshortening is exactly just that, simply a shortening of the form's length," I regularly tell my students, encouraging them to memorize it as a mantra. Therefore, when an arm tilts away from our line of sight, its length shortens visually—but its width remains relatively unchanged. As often happens, our minds tend to get in the way of our eyes, and many artists draw the arm's length too long. Or, on the other hand, they draw the arm too thin, trying to compensate for its shortened length. Either way, recall that mantra as you battle your unconscious urge to make the drawing conform to your expectations of what an arm is supposed to look like.
This battle with the mind can also interfere with your eye as you draw torsos, particularly in reclining poses. To comprehend better the dynamics of foreshortening, try thinking of the pelvis and chest as separate forms, connected by muscle. Notice in my drawing Reclining Woman how the hips, stomach, and chest interlock with one another, one form stacked in front of another. You'll also find this effect, in a less obvious way, when drawing a straightforward standing pose. For example, if you draw your model from below, you will observe the hip slightly overlapping the stomach, while the stomach overlaps the chest a bit, and so on.
Once you learn how to stack individual body forms one atop another, please don't overdo it as some artists do—particularly those who become infatuated with the curvaceous styles that belong to Michelangelo and Rubens. Rather than trusting their eyes, these novices look at the model and hypnotically see one balloonlike body part piled atop another. They then exacerbate their stylizations with florid, alternating thick and thin line work. Always keep this in mind: The curves you think you see on your model are typically a lot flatter than your brain wants to accept. Old Masters such as Michelangelo and Rubens found their styles naturally, by trusting their gut and looking at the model with a discerning eye. Likewise, let a style find you, rather than imposing one upon yourself.
Lines and Overlapping Forms
 |
| Receding Reclining Figure by Dan Gheno, 1998, colored pencil, 18 x 24. There are many ways to indicate visual distance, but notice in this case that each successive form is drawn in less detail and with softer, lighter lines as they retreat into space. |
Used sparingly, line can be your most potent tool for conveying the effects of foreshortening. As one form on the model intersects and crosses over another, let your line describing the front form overlap the stroke describing the back form. As you can see in my drawing Reclining Woman, the line representing the foreground ankle overlaps the Achilles' tendon, and the line following the edge of the knee cuts in front of the upper leg. Sometimes I like to selectively darken and/or thicken the line as it overlaps the back form, as I do here at the knee. Usually I selectively lighten the line portraying the receding form, as I did with the thigh where it passes behind the knee, before I let this line gradually darken again at the top of the leg where the thigh overcuts the stomach. Don't turn this tool into a predictable rule, however. Notice how I use it some places and not others. In this case, I felt the contrasty, bright-white tonality of the hip was sufficient to advance its form in front of the stomach area. It would've been overkill to add a line along the edge of the hip. It's essential to let a little air into the edges of your figure occasionally, rather than wrapping all the forms in an all-encompassing, stiff, and solid line.
Each of these overlapping, curving lines should have an evocative, implied directional movement to them that if extended across the figure would theoretically wrap around the forms like a ribbon. At times, it's helpful to let some of these outside contour lines literally wander onto the interior topography of forms. Called cross contours, these inner lines can add powerfully to the impression of volume on a form, especially if they're not too rigid, heavy, or dark. Don't be afraid to throw in a couple of discrete cross contours into your drawing that are not connected to lines that describe an outside edge—perhaps you're doing a drawing and you sense a swelling of form or the ridge of a muscle that can't be described by a shadow shape, halftone, or highlight. Follow your gut, and describe that swelling with a delicate, cross-cutting line.
You don't have to be quite so discrete about your use of cross contours when you are drawing drapery. Folds, cuffs, skirt hemlines, and belts are natural cross contours, and you should use them for all they are worth. An important rule of perspective intervenes here in your use of cross contours: Notice that cross contours are less curved as they approach your eye level. They curve more dramatically upward as they rise above your eye level, and conversely they curve downward as they drop below your eye level. For example, your model's belt will curve downward if you view your subject from above, and it will arc upward if your view is from below. The same belt might look straight if your eyes are on level with your model's waist. You needn't limit your use of cross contours to visible topographical form. Cross contours can be very helpful when trying to find the source of a limb where it connects to the torso or where a lower limb connects with an upper limb. I sometimes let my pencil wander across the figure's form with lightly stroked contour lines that both curve along the visible form and traverse around to the back side of the form as if the body were transparent. This results in a series of random cross-sections. Then I try to visualize how one of these imaginary cross-sections might attach to the form behind it.
Light and Shadow
 |
| Leaning Figure by Dan Gheno, 2008, colored pencil and white charcoal on toned paper, 24 x 18. |
Many artists purposely shun cast shadows, saying they are obtrusive. But I like to embrace them, using them like cross contours that roll over and define the underlining volume of the figure. Cast shadows are only unruly and obnoxious if you draw them without variation, ignoring this very important rule: Cast shadows and their edges are strongest near their origin, and their dark value and sharp edges gradually diminish as they fall away from their source. It's this gradation of edge and value, added to the cast shadow's fluctuating shape as it rolls over the figure's form, that creates a strong feeling of three-dimensional form.
In like manner, many artists underestimate or altogether ignore the forceful influence of light on a foreshortened figure. When drawing the model, notice how the halftones within the illuminated area gradually dim and darken as the model's body moves away from the light source. This phenomenon is particularly noticeable when drawing a standing figure at your eye level and lit from above. As the model's body subtly moves downward away from eye level, the subject's forms not only shorten but also darken. This results in a perspectival double whammy, with the graduated light synergistically reinforcing the physical foreshortening of the figure.
Light itself is subject to the forces of foreshortening. For example, you will typically notice a dark edge surrounding the periphery of your model when the light source is behind you and your subject is frontally lit. If you look at the figure from a side angle, this dark edge will seem to disappear, and instead of finding a sharp line you will discover a series of gradually darkening halftone shapes leading into the shadow shape. But from the front, these halftone shapes blur together. Like railroad tracks merging in the distance, these multiple delicate halftone shapes also merge, receding around the curve of the body to become one very thin but graphically foreshortened linelike shape.
Dramatic Foreshortening
 |
| Figure in Deep Foreshortening by Dan Gheno, 2006, colored pencil, 18 x 24. Be sure to calculate the size relationship of each body part before rendering the drawing. Through severe foreshortening, the foreground leg in this drawing is visually almost as large as the receding rib cage. |
There will always be some foreshortening distortion in every pose and in every body part, even if it is only within the uplifted protrusion of the nose or the swelling of the wrist in a flat, frontal view of a model. But when you intentionally want to create an extremely dramatic, foreshortened figure drawing, realize it's not just a matter of randomly piling large body parts in front of smaller body parts—even though creative exaggeration can be a natural part of the process. Your drawing will look disorganized and your figure disjointed if you don't find some sort of orderly relationship and rhythm running through the body parts as they visually diminish. You need look no further than the model posing in front of you for the answer—there's an innate, graduated rhythm to all foreshortening on the human body. Notice that if you are extremely close to the model, the perspective distortions are extreme, whereas the size distortions gradually become less dramatic in the more distant portions of the model. Try standing in a three-quarters pose in front of a mirror. Then, extend one of your hands toward the mirror, touching the surface. Compared to your torso, the fingers will look gigantic, the rest of the hand fairly large, the adjoining arm pretty big and the shoulders slightly larger than you normally expect. Some foreshortening will still occur between your torso and your far arm, but this foreshortening will appear minimal compared to visual distortions in the near arm.
When drawing a model from a severely foreshortened angle, trust your gut at first by mapping out the proportions with only your eye as a guide. It's normal to feel a little uneasy about the quality of your initial observations. Once you've blocked out the entire figure, you may want to test your proportional calculations by measuring one body part against another. Generally, if you've made a mistake, it's in the smaller, more distant parts of the figure, where you may have stretched them out in compensation for the larger, near segments. For this reason, it's most effective to enlist the nearest, largest body part as your unit of measurement, such as the sole of the foreground foot in a reclining pose in which the model's head and chest are farther away from you. In this situation, many artists make the distant chest too big, something you'll catch more quickly if you compare the length of the visually larger foot against the chest. Whatever you do, don't wait until you've completely rendered the smaller far shapes before you measure their lengths against the closer, larger shapes.
So often, artists get into trouble when they draw a seated figure with one leg bent and one leg straight. They draw the lower, receding portion of the bent leg too long—even if they've made the same mistake a million times before. Then they draw the straight leg longer to accommodate the bent leg, and before you know it the entire mass of legs is much too long. These artists frequently compound their mistake by also drawing the top portion of the bent leg too long. Although the lower leg may angle away from you more radically than the top portion of the leg, unless you are standing directly above the model's lap, foreshortening will exist in the upper leg as well.
Putting the Parts Together
Even with all the body parts accurately sized and positioned, you still need to consider the transitions between each of the forms. Muscles and tendons serve as the natural transition lines; find them in the model in front of you, and use them in your drawing to capture the inherent, graceful, spatial flow that exists between the individual form segments of your overall figure. If you are doing a line drawing, let your line follow the edge of these muscles or tendons. There are many helpful overlapping muscle and tendon transitions, such as in the knee area; on the front, the sartorius and adductor tendons wrap and attach below the knee joint, and on the backside, the hamstring muscles bridge the upper and lower legs. Keep in mind that the transition lines that cross over a joint will always belong to the advancing portion of the limb. For instance, if the upper leg and the knee project in front of the lower leg, you should draw the transitional line that describes the forward edge of the knee with a heavier hand and let the stroke cross over and overlap the lower segment.
I could write a book describing all the other transition points on the human body and foreshortening in general—I haven't even hinted at the psychological implications of foreshortening. Indeed, many good books touch on the general problems of perspective and foreshortening of the human figure. Ernest Watson and Joseph D'Amelio wrote books on perspective that are a great starting point for practical visual issues, and Kenneth Clark's book The Nude and books by Gombrich and by Arnheim deal with the psychological aspects. But if you trust your eyes—and if you work to rid yourself of mental preconceptions that get in the way of portraying foreshortening in your working, you will find all of it on your own. As everyone knows, when walking across an empty field, your best defense against snakes is a pair of wide-open eyes. So it also is when drawing the foreshortened figure.
Drawing Foreshortening Models Allan Books Gootfied
Source: https://www.artistsnetwork.com/art-techniques/learning-the-essential-facts-of-foreshortening/
0 Response to "Drawing Foreshortening Models Allan Books Gootfied"
Post a Comment